


Recently I came across with a very interesting and rare plugin. As it was new for me and I haven’t encountered with something similar like that before, I decided to test it and share my results and observations with you. I am sure that it’ll be very usefull for you and you will enjoy using it. Every professional website, with content which need to be secure is using such kind of plugin, which I am going to introduce. Besides, it gives not only an opportunity to protect the content of the website but also somehow to follow how many people are interested with the website and how its popularity is progressing. The plugin about which I am speaking is the Login plugin for WordPress. Hope that this post will help the website creators find its advantages and appliance to their websites. So, let’s go through the plugin and find where it can be used.

As it is shown in the screenshot, where the logo of the plugin is presented, the plugin is designed for protecting the data of the website and provide visitors with an additional information. As a matter of fact, only those visitors can have that information who are able to log in to the website. Let’s see how it is possible to create that lock, the role of which can play “log in” and “sign up” buttons.
Overall the login plugin consists of several parts which need to be observed. The core of this plugin are settings option. They are helping a website creator to form a “log in” or “sign up” button. Not just create but also set all necessary tools for making it function properly. As a person who is more or less related to the sphere of art, I can say that a backend design is very minimalistic and convenient. However for a website creator, who is getting acquainted with this plugin first time, it can be a little bit confusing. But after several minutes of work with it everything becomes clear. So, if we go to general settings we can see that it consist of six separate blocks. The biggest block is a “Global” section. Let’s go one by one through global options and see for what they are included in the plugin.
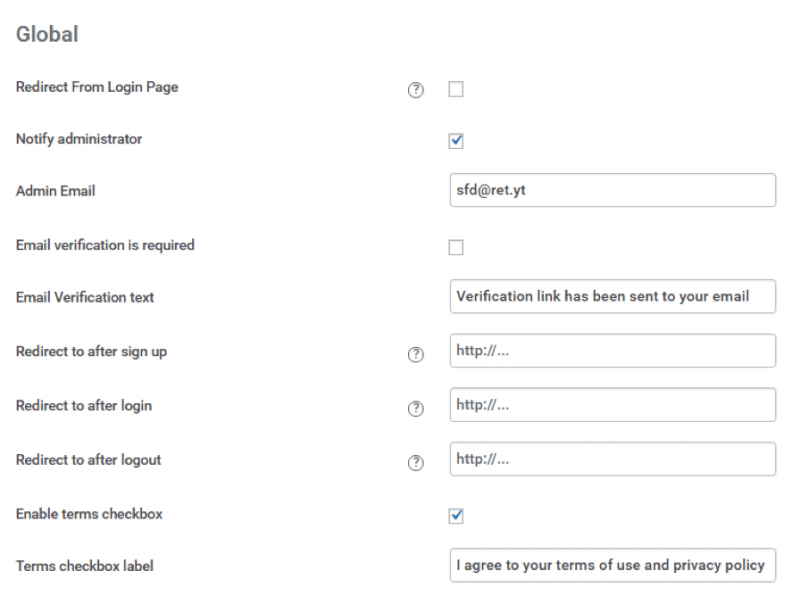
Let’s start from the “redirect from login page” option. When this option is chosen then after visitors’ login, they will be redirected to the certain page. Let’s say that a website creator has a website where the signe up person has a personal page something like an admin page. Then after being logged in it is possible to direct a visitor to his/her admin page. When a website creator is completing an administrator email, then he/she will get a notification if someone signs up to a webiste. As I said at the beginning of the post this plugin is helping to follow on the popularity and effectiveness of the website and this option show how it is possible to do. Let’s move on and see what the verification option does. I am sure that everyone used such kind of link. When someone is signing up a verification link is generated , which goes to the email address given at the time of registration. Then a visitor need to go by that link and activate account. After completing the popup the verification popup will appear at the top right corner of the page, which shows that everything was done correctly.
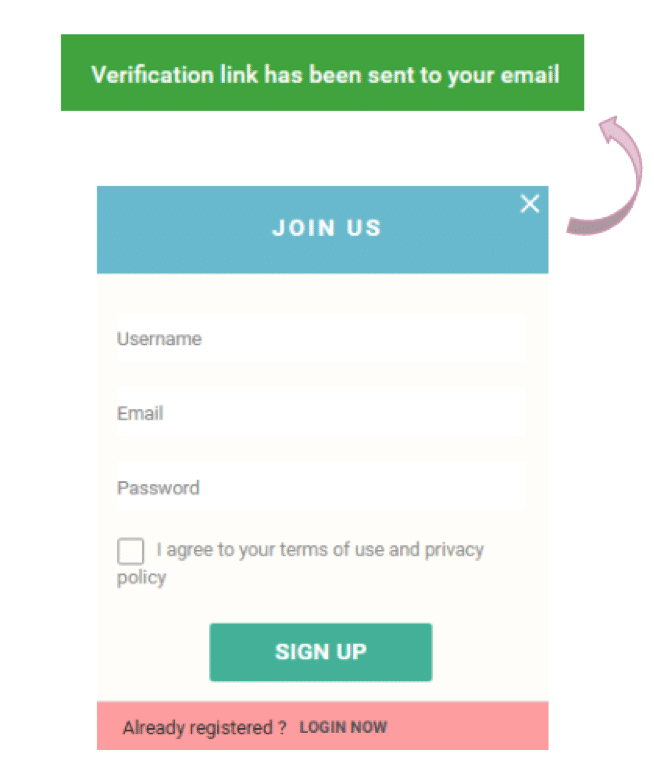
And the last thing of this “global” part is a Privacy and Policy agreement option, which can be enabled or not. As it is shown in the screenshot the it is written “I agree to yout terms of use and privacy policy”. This text can be changed as well.

The next two blocks are signup and login blocks. They are designed for changing the text of the buttons. For example the sign up buttons can be changed to subscribe.

Two separate popups are related to the password, which help to reset it and change it when a user forgot his/her password. This is working in a regular way like all other password reset options are working. And the last block of this section is “account options” part. As I’ve mentioned before after the login a person can be directed to their home or admin page. Thus, such kind of page should contain its constituent and necessary options such as for example log out, My account etc.
So, these are all the global options which are creating the maquette of the login popup.
For decorating that maquete, adopting it to the design of the whole page it is necessary to go to “Design” section and start to test all options on by one. They arenumerous and almost everything can be changed in the popup and not only. Besides changing the popup color, header and footer color, font color and so on, it is also possible to change those buttons color and style which are added to the page. So, the popup appears only after clicking on the “signup” and “login” buttons, thus it is important to create a beautiful button which will let the visitor to sign up to the website.
One of the most essential parts of such kind of popup is being logged it with the help of social networks. I am sure, that there will be a kind of visitors, who wouldn’t like to subscribe or sign up to the page but this plugin is giving an alternative variant to that users as well. Within this plugin social buttons can be used as well , especially the facebook button. It has a little bit dissimilar way of creating because it needs facebook application.

For creating a facebook application it is necessary to go by the following link:https://developers.facebook.com/ and get the Facebook application ID. Unfortunately, it has only facebook button option but without any doubt it will be possible to add other buttons as well with the help of CSS codes.
And the last part of the whole plugin is the Security. For the security this plugin creators decided to use Recaptcha and of course for using it is vital to generate public and private keys, which can be done with the help of this link: https://developers.facebook.com/.

After creating a login popup, buttons and all other settings it is right time to add a shortcode to the page. As it is shown in the screenshot there are two separate blocks, one of theme is designed for the login button and the second one for the sign up button. So, it is simply necessary to copy and paste the shortcode to the page or post.

As for me, it is a little bit inconvenient to have a button directly in the post or the page. So, I’m going to add a shortcode to the widget. For adding a shortcode to the widget it is necessary to go to appearance > widgets.

When the login plugin is added to the page with the help of widget then there is no necessity of using shortcode. It is crucial just to add a plugin to the widget and then save it. That’s all!
Finally, we reached the end of this post. Hope that it was interesting and efficient for the readers. To use it or not, to test it or not is every reader’s personal opinion and desire but my mission was to share my own experience with WordPress and somehow be useful for them.
Bio:
My name is Anna. I adore creating and sewing dresses. For creating a commercial website (shop) and selling my dresses I use WordPress with its wonderful plugins. I am not a website developer or expert in creating websites, but all those plugins which I use are very simple and they help me in reaching my aims and even dreams. So, if you have any suggestion or advice feel free to contact me on the LinkedIn.

You must be logged in to post a comment.